
At this stage, you have decided to make micro-irrigation the ideal irrigation technique to meet your needs. You are almost ready to take action! Do not be intimidated by the technical installation of the system and start with a plan. No need for artistic skills to make your plan, simple scribbles will do. The important thing is to understand each other to avoid measurement errors.
Recall the benefits
The purpose of micro-irrigation is to automate the correct distribution of water to ensure optimum plant development. In addition to saving time, the sprinkler system is one of the best methods for optimal water use without losses, since it is released to the ground where it is needed. As a result, weed growth is minimized. Spread is gentle, without compacting the soil, water loss by evaporation is limited and the foliage of the plants is not wet, which reduces the risk of fungal diseases. Drip irrigation is an ecological and sustainable solution. If well maintained, micro-irrigation systems can last from 15 to 20 years. To learn more, read our article: What is drip irrigation?
Plan
No need for artistic skills to make your plan, simple scribbles will do. The important thing is to understand each other to avoid measurement errors. A plan facilitates the purchase of the right parts in correlation with its respective irrigation areas. The effectiveness of the system is largely based on the choice of drippers and micro-sprinklers according to the previously determined zones.
1) Measure and draw your space
The first step in planning the irrigation system is to realize the potential of your space by drawing the objects that compose it and then measuring them.
- Obtain grid paper to draw a scale drawing. Example: 1 square is equivalent to 1 square foot.
- First, note the measurements of your surrounding environment: exterior walls of your property, garage, trees (especially those that make shade), swimming pool, BBQ or any other object to consider in the field.
- Draw the elements in a dive view on your land (seen from the sky).
- List your water outlet. Record the height between the faucet and the floor.
- If you use the system for your potted plants, consider their height, length, and width in your measurements.
2) Determine your irrigation areas
The second step is to determine the irrigation areas. The effectiveness of the system is largely based on the choice of drippers and micro-sprinklers according to the previously determined zones.
Indicate the different areas of irrigation using numbers or color markers depending on the type of plants to be watered and their water needs: potted plants, lawn, shrubs, flower beds, trees, shrubs, garden.
Add remarks depending on soil condition, sun exposure versus shade. The amount of water required depends on it.
Note that each irrigation zone will have its own pipe that will serve a group of similar drippers or sprinklers.
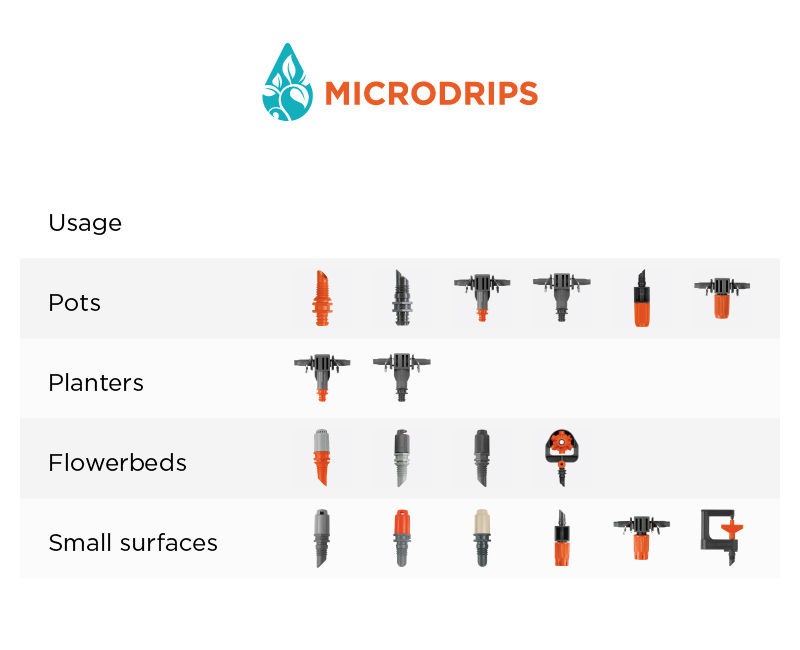
Determine how your drippers will fit on your pipe. Drippers, in an end-to-end line, facilitate access to plants located in the center of a square or rectangle plantation area. Isolated emitters or micro-sprinklers, that is, the pipe opens onto a single nozzle, are ideal for single plants.
Note the type of emitter / sprinkler ideal for each of your areas. See the chart below to help you choose:
3) Calculate the water flow
It is essential to know the flow and pressure of the water before buying your parts. The calculation of the water flow available for the entire system makes it possible to establish the number of drippers or sprinklers that can operate at the same time. The more we add, the more the last online risk of running out of water!
The pressure / flow is theoretically quite stable for all lines. The pressure remains at 1.5 bar, while the water flow is determined according to the irrigation plant that you install. The 1000 plant (Gardena # 1355) has a flow rate of 1000 liters of water per hour, while the 2000 plant (Gardena # 1354) spins 2000 liters per hour.
Determine the maximum water flow capacity of each irrigation zone so that the number of drippers does not exceed this maximum using the table below. Note that the maximums are calculated for a 1000 plant. It is then necessary to double for the 2000 plant.

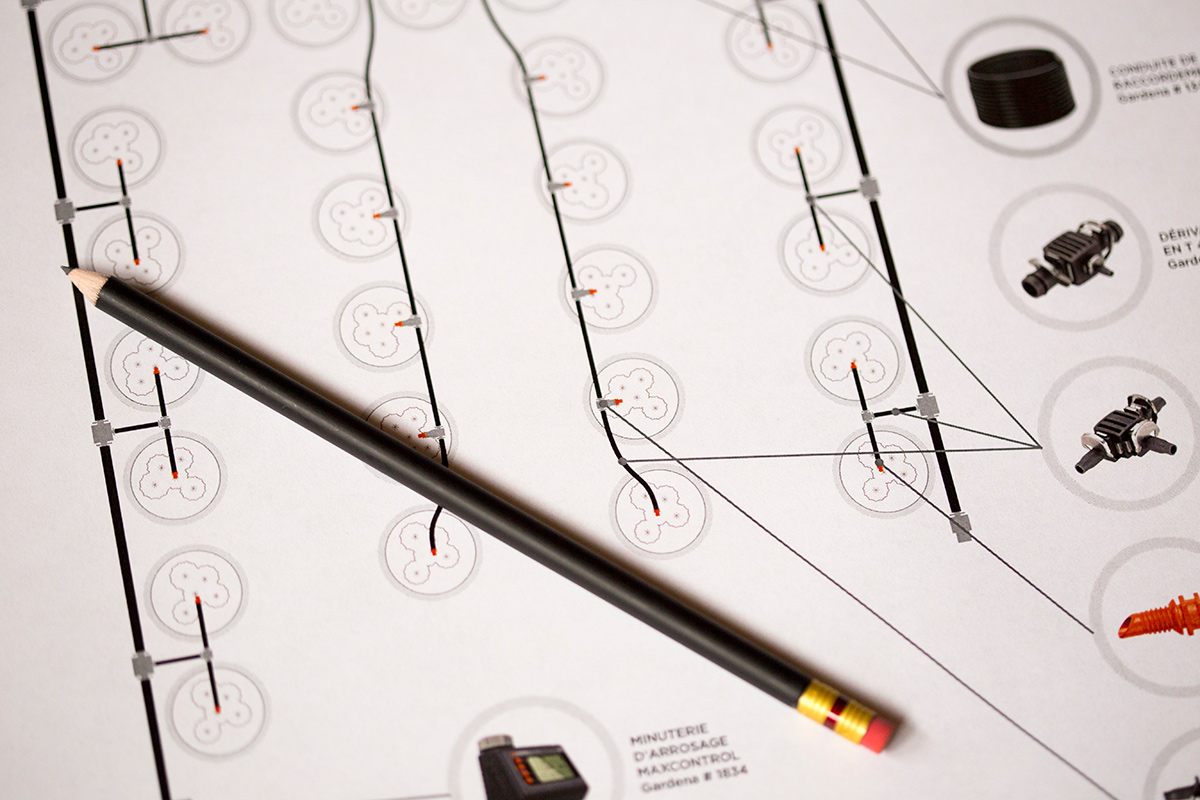
4) Draw the pipeline of pipes
The last crucial step before buying parts is to draw your “paths” of pipe, that is to say to position and connect each of your pipes together. It will be necessary to plan and draw the pipe of the main watering pipe and the pipes of each zone, then those leading to each sprinkler and dripper.
- In general, all parts of the micro-irrigation system: the irrigation plant, the pipes (large and small), connectors, drippers, sprinklers and plugs to close your lines should be indicated on your plan.
- Know first and foremost the dimensions of the pipes of the irrigation system. The large 1/2 inch pipe and the small 3/16 inch pipe are 15 m (49 ‘) long.
- Draw the course of your main pipe 1/2 inch from your faucet to the beginning of your zones. Conduct other 1/2 inch pipe segments in each zone. Within areas, conduct your secondary lines 3/16 inch to each plant.
- For the use of sprinklers, trace their spray radius using a compass. Make sure you do not leave any plates dry.
- With each pipe deflection, identify the type of connectors you need. There are different types of connectors available for each of your small or large pipes.
- To know the spraying radius of the sprinklers, the types of existing drippers and connectors, refer to the demonstrative diagrams of our article: Demystify the parts of the micro-irrigation system.
Purchase of parts
With a piping plan that takes into consideration the type of drippers and sprinklers, you will be able to choose the right parts. Along with your plan, make a list of required parts. As MicroDrips offers starting sets, compare your list to the different parts contained in the sets: Micro-irrigation starter kit, Starter kit for flowerbeds and vegetable gardens, Terrace starter kit, Flowerpot starter kit, Starter kit for greenhouses. Generally, the starting sets contain most of the desirable parts for predetermined needs. However, do not restrict yourself to the proposed sets, many pieces per unit available to you, including watering timers are probably the most popular of all. Check out the online store to see the possibilities.
If your space is complex or you want to make it easier for you, contact MicroDrips. We offer a support service and can provide you with a precise digital plan according to your needs.